Showing posts with label Technical. Show all posts

Monday, February 27, 2012

Side stand mount dimensions?

Mike writes in with this request for help:

The side stand mount on my bike was broken of at the welds when i bought it. I got a stand from a fellow parting his bike out. Unfortunately I still have nowhere to mount it. I have plenty of steel stock laying around and access to enough welding and machining tools to make it happen, but I could really use the dimensions of the side stand mount. If anyone took the time, I'd be very grateful! (enough to lend a hand and fab one up for anyone else needing one!)

If anyone can help out, comment below. Thanks.

Sunday, January 15, 2012

Reader Electrical Gremlins

Mike writes in with an electrical question:
I recently purchased a not-quite-running Yamaha R5B, and first off I'd like to thank you for compounding all the information you have! your site has been a major help while I'm working on the bike, and for just learning all I can about it since it is my first motorcycle. I have two questions for you, the first is that the bike didn't come with front turn signals installed, but luckily I was able to get ahold of the correct pair from my uncle. Unfortunately my wiring knowledge is limited to replacing wires where the old ones were, but with your site's help I was able to hook up the brown and green wire clusters to their respective bulbs, but I am not sure where/how to ground them. Both have the eye terminal wires coming off of the bolts on the signals, but I am unsure of where exactly to plug them into. The second is that the bike has a short somewhere and keeps blowing the main fuse off the positive battery terminal. All lights/signals/horn work as they should it seems (except the ones I haven't grounded/hooked up). The bike starts, will run for a minute or so before either dying of a spent battery or the main fuse going. I started checking for continuity, and sure enough there was continuity between the positive and negative battery hook-ups with the key on, started following it back and it lead me to the red wire entering the rectifier. I'm not sure where to go/what to do from there, or even if there is supposed to be continuity through there! Do you have any insight/ideas for tracing the fault? Thanks again for the site, and any thoughts you may have!
Any feedback or suggestions greatly appreciated.

Thursday, January 5, 2012

Gearing Questions

Geoff writes in with a few questions on gearing:
I recently purchased my first 1972 Yamaha R5C from a coworker for $100!! (The bike has 11,000 miles on it) When searching for restoration info I came across your amazing site. I am anxious to start riding this beauty ASAP and was looking for a little advice. I am finding that most people start with handling and engine issues. The engine appears to be running well, but I feel I need to replace a few key components (sprockets, chain, brake shoes, etc.) I am having trouble finding concise info on how to gear the bike. Do you have any suggestions on what size front and rear sprockets to use and what type of chain? This is my first street 2 stroke and I will be using it mostly for occasional pleasure riding. Any help or referrals to info would be greatly appreciated!

Wednesday, March 16, 2011

Reader Mail and Questions


Mike wrote in yesterday with some nice things to say about the site, as well as an interesting question:

How are ya? I'm a new R5 owner (as of Saturday) and found the site in my research travels! Very cool stuff. I've wanted an RD forever and lucked into an R5 basket case for $40, so I couldn't say no. I currently have several 70s era Honda projects, including a 1968 CL175 sloper (only year made) cafe racer project and a 1972 CB350 custom hardtail chopper. Anyhow, you don't want to hear about the old Hondas cluttering up my garage!

I'm actually writing because I found an article online awhile back that had some interesting modifications that racers used in the 70s on their R5s. One of which was a swingarm swap from a Yamaha enduro (I believe) of the same era that extended the wheelbase by 1.25" thereby helping to keep the front end down under hard acceleration. I am building vintage race replica for the street with my R5, plan on some basic power upgrades, and would love to do this swinger swap. I cannot for the life of me find the site again though.

That said, would you know what bike the swinger needs to come from? The DT360s of the era look similar, but I cant seem to find anyone that will take proper measurements for me. I could always lengthen the stock piece (as I've done before for bobber and racer projects) but would prefer not to.

Thanks for your time, and I look forward to seeing more of the R5 site!

Thanks for the kind words Mike, and congratulations on the find! $40 sure is a deal!

There's of a lot of interchangeability between the R5 and the early RDs, and had heard of brake and transmission swaps most commonly. Makes sense that you could swap in a longer swingarm from within the Yamaha family and have things line up pretty well.

It also makes sense that a longer swingarm would help keep the R5 from pointing it's nose to the sky so much. I couldn't find much on swapping with an Enduro, but I did find mentions on a swap with an RD400 (assuming a 1973 model year or close). As with any swap of this nature, I'm not sure how it might mess with the suspension geometry...

I also noticed in my research that Spec II offers a racing swingarm with an adjustment for stock axle position or 1.5" rearward. Check with them to see which application would fit, as well as what other adjustments might be necessary in terms of suspension setup. Might be worth looking into, especially if you're looking to go for more of a racer look.

Does anyone know of any particular enduro swingarm swaps? Anyone willing to forward some measurements?

Thanks again Mike, and congratulations. Send pics of your progress and I'll be sure to post them here.

Friday, September 17, 2010

Jesse's R5 Project - Tips and Questions

DSCN2884.JPG

Jesse in Pittsburg writes in to show us his progress, share a few things, and ask some questions:

Hi Lawrence,

After a long hiatus, I'm back to working on my R5C project. I've got the bike stripped down to the frame, as you can see here:

http://www.flickr.com/photos/jtroy/sets/72157624609357225/

I've made a list of items that are going for powder coating and painting (see attached). I wonder if anyone can add to the list? Did I forget anything? If you want, post this list on your site. It might be helpful for others doing a frame-up restoration. You may also want to post the PDF copy of the parts catalog that I found (also attached).

Please also ask whether anyone has advice for removing the steering lock from the frame. I've drilled out the rivet but the lock still won't slide out (see photos at the link above). Is there some trick to getting it out? I'm hoping it won't be necessary to drill the lock to pieces to get it out!

Thanks Jesse! I'm sure some folks will find this useful:
R5_powder_paint.xlsx (40k Excel doc)
R5_R5B_R5C_Parts_Catalog.pdf (484k PDF)

As for the fork lock, I'm not sure how that's held in... It's not very well illustrated in any of the diagrams I have (see links at right). Anyone?

RD 6-speed swap

Received an interesting question from Cale out of Amarillo, Texas:

Lawrence,

I've been enjoying your R5 blog... Good stuff, man.

I keep hearing about upgrading the R5 transmission to a 6-speed out of an RD. I'm due for a transmission rebuild on my R5C, and I'm wondering if I just need RD internals, or a complete RD case for the upgrade. Maybe you can shed some light on this. I can't seem to find any information on the subject other than that it's a wise swap.

Thanks for all the good reading and pictures.

As far as I've heard, it's pretty much plug and play. I don't have any experience with the conversion... can anyone shed more light on the subject?

Tuesday, July 6, 2010

Fork Lock on a 1970 R5?

Laura writes in to say hello and ask this question about fork locks:

For one your web site is awesome!! I'm trying to figure out if all 70's have a steering lock key.. I keep looking but do not see one on my bike. And I guess I'm trying to find some shows to go to or put my bike in. 1970 yr5 1200 original miles immaculate condition.

I have an R5C, which is the 1972 model year, and unfortunately all of my manuals are 1972 or later (see links at right), so I'm not sure about the lock on the 1970 year. If your manual says you have one, then you just might... try looking here, on the fork under the left-hand end of the handlebar:


This comes from my original R5C rider's manual - download the whole thing here (26MB PDF). The instructions are confusing. Gotta love the typos, too...

Anyone know if these locks are found on 1970 models?

Thursday, July 1, 2010

Questions about Bars, Mirrors, and Leaky Pipes


Alex wrote is with some questions:

Awesome R5 you got! Where did you get your cafe racer handlebars and mirrors? Also, does your bike seep oil from it's pipes? If so, any tips on how to correct that?

Alex -

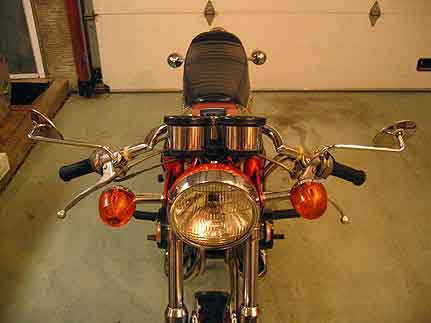
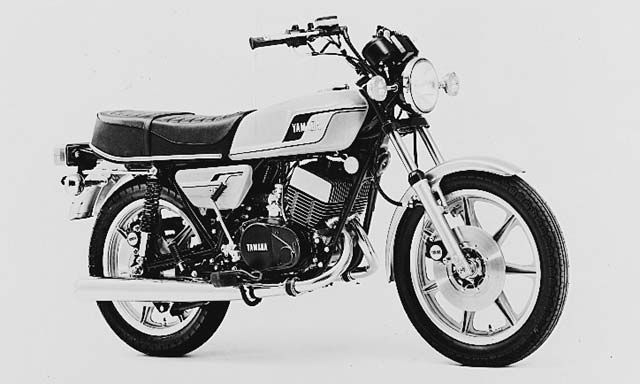
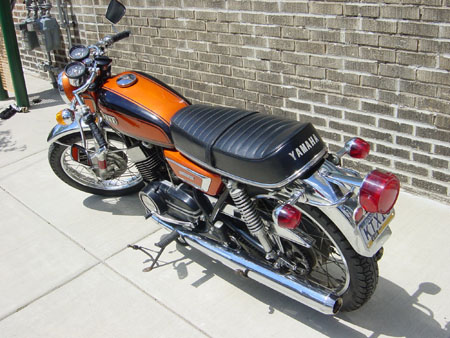
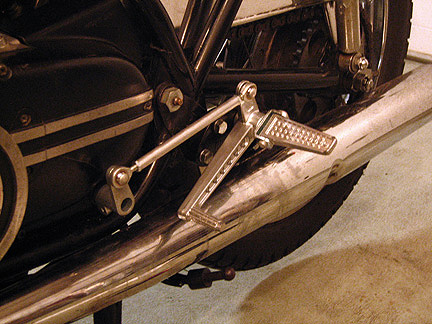
Thanks! I replaced the stock bars for lower, somewhat uncomfortable (until I added rearsets) but much better looking cafe bars. The bars are clubman-style, non-adjustable, similar to this. You can find them just about everywhere, in a few different styles and finishes. Just make sure you get the right diameter for the Yamaha.

Note: In order to get the clutch lever off the stock bar, I had to cut off the stock hand grip. I tried not to, but the sucker wouldn't budge. Once the one was cut, well, I went ahead and replaced them both with ProGrip 699 Superbike grips. They have a good vintage look to them, and are pretty cushy to soften vibrations. I simply took an Xacto to the grip ends and trimmed myself a hole on both sides to make way for the mirrors.

Now about those bar-end mirrors... while looking great, no matter how much tightening and adjusting, they just never stayed put. The one thing I could count on was a good view of the ground behind me or my armpit - not good when you actually need to check your background for a quick lane change. They may have just been the brand I ordered (Napoleon), so your mileage may vary.

Anyways, I decided to remove the bar-ends, replace the stock endcaps in their stead, and remount the original stock dental mirror. I managed, after quite some searching, to find a NOS right-side mirror. It didn't quite fit, but with a little Loctite and some swearing I made it work.

The stock left mirror that came with my bike is convex, so it gives me a greater viewing area on my passing side, while the right mirror is flat and just gives me a direct view of what's behind me. The way they're mounted (into the threads on each lever) they are high enough to be useful but not look like antennae, in keeping with the whole cafe racer aesthetic.

As for oil seeping from pipes, I do get a drip or two now and again, same from the case bottom. Nothing too serious. If you're having more than that, I would look into it... anyone here have any suggestions?

Wednesday, March 24, 2010

Mandarin Orange Paint Code


Paul writes in with a frequently asked question:

Hi. I am restoring an R5 and came across your thread. You mentioned House of Kolor paint but in regards to mandarin orange I didn't read what orange from House of Kolor you used? Can you let me in on this color?

Good question! I've gotten a bunch of email from others looking for the orange metallic paint that's used on the R5... see these documents:

1971 R5B (656k PDF) - Mandarin Orange over white
1972 R5C (756k PDF) - Mandarin Orange over black

Well, after rooting around a little on the internet, I found a discussion about this very topic:

There are no codes! House of Kolor has paint that will get you there. Here is a link: http://www.hokpaint.com

I have restored many early Yamahas and the orange you need is a candy shot over a silver base (fine grain). Black is black as long as all the black body parts are the same black. I've gotten a dead-on match to this color on my '71 R5 and I've matched the candy red on my '65 YDS3 and the candy blue on my '66 YM1 using these paints. The color varies depending on how soft or heavy you spray it on. That's how candies work, all the metalics are in the base coat and the color coat is translucent so more = darker. I hope this helps. Ed

So there you have it... there is no easy one-step solution. And, I'm not sure which HoK orange best matches the Yamaha mandarin orange.

However, I have found an outfit that is offering paint kits for all hard-to-find vintage Japanese bike colors, called Marbles Motors:

I am offering paint kits for the early 70's Hondas, Kawasakis, Yamahas and Suzukis. Perfect matches for the non-existent Candy and Metallic Colors that make or break a restoration effort. These colors have been elusive as Candy paints are not that popular these days, but I've managed to get the most popular colors matched and I am offering them in a kit along with the proper base color and catalyst that creates the original look of the bikes. E-mail me for more information. The paint is Deltron PPG DBC. If you don't see your color listed below and have a good representative part, I can do the matching process and provide you with the paint. Please be aware that the only shipping option for paint is via FedEx ground. Unfortunately, that means no International shipping. You get all the necessary materials to use or give to your painter with the exception of the primer and reducer. I can also supply the black or white paint for stripes, as well as the reducer if requested.

Looks like he has a Mandarin Orange paint kit that matches a 1972 Yamaha JT-2 mini-enduro (see examples of his restorations here, here and here). Same year as the R5C, so it makes sense that the color would match up - looks like it could, looking at the photos from his restorations. Worth investigating!

Get in touch with Randy Marble via email here.

Hope that helps!


Parts of this article originally appeared earlier on this blog here.

Sunday, March 14, 2010

Recreating Dad's Bike


Kynan recently wrote in and was asking about the R5 for an interesting project he had in mind for a project bike:

My father had a R5 in 1972. He has spoke of it as one of the motorcycles he misses the most. I believe it was one of his first bikes. I found two pictures of him and the bike in one of my grandmothers photo albums. If I send you the images perhaps you can tell me what year, color, and any info on bike? I am wanting to build him an exact replica as a surprise. If I know some details I can find a bike to buy and restore. It will be a fun project. I have restored many bikes myself. I just don’t know a ton about the R5. Thank you for your time, I really enjoyed your blog!


After looking at the photos (above) and referring to this information:

1970 R5(A) - Metallic Purple/white
1971 R5B - Mandarin Orange/white
1972 R5C - Mandarin Orange/black

... we can pretty much determine that IF the R5 was stock, at least in terms of body panels and paint, then it must have been a 1971... Coincides with the "1971" that's penned in under the photos. (Here's an earlier post from this blog about determining the year of a bike, as well as a complete spec list.)

Anyways, this is turning out to be a very interesting story. I've asked Kynan to keep us posted about the build and to send photos when he can. More to come!

Monday, November 26, 2007

Reader Mail / Relocating Signals

Michael Brito wrote in:

Great web site. Awesome bike. In fact your R5 inspired me to refurbish an R5 of my very own. I would like to know where you got the turn signals for your R5 so I can relocate mine. Did you farm out most of the paint work? How much $$$ did you put into your R5?


Thanks for writing!

I wrote a little about relocating my front turn signals here. After Mike wrote in, I realized now that I didn't go into much detail. I hadn't bought aftermarket signals, I just used the ones that were already there, but were mounted to the forks using brackets. From what I can remember, here's the process:

- remove the nuts on top of the forks
- slide off bracket and turn signal
- remove bracket from turnsignal
- replace fork nuts
- disconnect wiring to signals (no cutting necessary)
- remove headlight from bucket, reroute wiring (from bike) into the bucket from the hole in back
- remove nuts holding bucket to flanges on both sides
- run wiring (signal) through holes in headlight flanges and bucket
- align signal base to depression on flange
- use signals to hold bucket to flanges, reuse nuts to tighten bucket and flange to signal
- reconnect wiring, test
- remount headlamp

Sounds complicated, but I figured it out just by fiddling around myself, so with the above directions anyone should be able to do it no problem.

As for the paint, I was lucky and found a bike that had been parked in a garage for most of it's life. There's little damage, just a few dents and chips. I haven't done much in terms of paint besides cleaning and waxing.

If you're looking for the metallic Mandarin Orange paint, unfortunately you're out of luck as it's no longer made. Here's a link to some discussion about a possible House of Kolor alternative.

All in all, I haven't spent much on the bike, $550 to buy, and about $1000 in parts and work to get it running, inspected, new tires, new bars, one new sidecover, and a NOS matching mirror. Not bad for such a great little bike!

Thursday, October 4, 2007

FixTheBike.com


Came across FixTheBike.com while I was updating the links in my previous posts (manual downloads should work correctly now). It's a great idea, similar to this site but much broader in scope - bring together all sorts of documentation on all sorts of bikes in one place for free download. From their wiki:

The first place on the internet that will try to pull together a vast ocean of motorcycle information into one place for everyone to find and use completely free of charge or restrictions.

The site looks very empty until you log in. Once logged in you will gain access to everything. This is to help prevent spammers and other bots from wrecking the site.

So please enjoy yourself. Please strongly consider uploading any documents you may have as this is the only way we can grow. Donations are always more than welcome to help cover bandwidth costs.


I already saw some stuff from this site up there, and I'm in the process of uploading some more...

Wednesday, August 15, 2007

Manual Madness!


Tom writes in with some great stuff he'd like to share:

I have been using your site for months now as I work on restoring my 72 R5C. I was kindly sent these files though from a fellow two stroker I met though Craigslist. He insisted that since this info is so hard to find that I should share it in any way possible. So I am sending it to you for if you want it on your site. I am not sure of the legality of this though. This info is very old and I doubt any publisher will say anything, but you never know. These files are quite large though and will take a while for people on dial-up. They have all been worth their weight in gold to get my R5C on the way to running again. Maybe in return if anyone knows of a killer deal on a pair of carbs for my bike they can drop me a line?


Here are links to the files. They're rather large, so be prepared for long download times:

Yamaha Service Manual for DS7, RD250, R5C & RD350 1972-1973
Yamaha Motor Corp, 1974
51.75MB, 113 pages

How to Fix your Yamaha Two Cylinder, Two Stroke Motorcycle
Intertec Publishing Corp, 1975
76.25MB , 86 pages

Yamaha 250-400cc 2-Stroke Twins - 1965 - 1978 - Service and Repair Manual
Clymer Publications, 1978
88.55MB, 190 pages

And please, let me know if you can help Tom out with a set of carbs!

Monday, August 13, 2007

R5C 350 Riders Manual


Seeing as it's extremely hard to come by these days, and seeing as how mine is slowly crumbling, I figured I'd scan and post the "Rider's Manual" that came with the R5 when it was new. Fair warning though, it's a fairly large file. Enjoy!

R5C 350 Riders Manual (25.5 MB PDF)

Thursday, June 21, 2007

R5 Wiring Diagrams


Ok kids... a lot of you have been asking about electrical issues. Seems these bikes (as just about anything 30+ years old!) have a bunch of gremlins, and it can be a real pain sorting everything out. I'm in the middle of it myself. So I thought I'd revamp the diagrams on the site as well as highlight them all in one post here.

- R5C Wiring Diagram - from the 1972 Rider's Manual
- R5F Wiring Diagram - not a US model
- RD 250/350 Wiring Diagram - for reference, should you need it

Also here are two diagrams tracing the physical wiring harness as shown in the factory Service Manual to help you locate everything:

- R5C Wiring Harness Diagram 1
- R5C Wiring Harness Diagram 2

And finally, here is a link to a PDF of the electrical section of the factory Service Manual (via OMP).

Gotta love all the hand-drawn complexities and typos throughout! Anyways, I hope this helps!

Sunday, April 29, 2007

Main Switch Diagram


A reader of the blog recently wrote in asking about the positions on the main switch, particularly the rightmost position. Here's a scan from the 1972 R5 Owners' Manual which sums it up nicely.

Wednesday, October 18, 2006

Lacing a Spoked Wheel


Instructables has a great step-by-step how-to on lacing wheels. Although the wheels in the example are from a Royal Enfield Bullet, the info within is still an excellent read. I've seen the motorcycle builds on TV and this process has always confused me. Check it out.

Thursday, October 5, 2006

Mikuni Super Tuning Guide


Just came across this handy manual on the Mikuni USA carburetor owner's and tuning manuals page. This downloadable and printable manual helped me understand the inner workings of my VM carbs. Below is the direct link to the relevant PDF:

VM "Round Slide" Tuning Manual (1.3 MB)

Wednesday, June 14, 2006

Some hard earned knowledge of the DS7


I came across this DS7 page while helping out Nate, who recently picked up a DS7. There's a good section at the bottom that offers some tips that could be of some use for later Yamaha 2-stroke riders:
Riding technique is important. If you are not in the power band (6000 rpm up), twisting the grip to full throttle is not useful, and actually just helps foul the plugs. Be very patient and wait, or shift gears, until the engine gets to at least 5000 before hitting wide open. Otherwise you are just dumping extra oil into the cylinders and ruining your plugs.

The mufflers are too restrictive even when absolutely clean. They rapidly strangle the machine as they plug up with oily soot. So you need to drill a couple of holes about one eighth or 3/16 of an inch in diameter in the end of each baffle so some exhaust gas can bypass the baffle. It's best to not drill in the chrome area, just beside the exit hole is OK. Then you have to keep the baffles pretty clean, and maybe make a scraping tool to clean them out without always having to remove them. A long screw was what I used. (about 10 inches) I used it kind of like a little rake to scrape out the baffle.

Metallic ash can foul the spark plugs. There are two sources of this, one is leaded gas, which you can't find any more so no worries there. The second source is the 2 stroke oil. Yamaha says use oil "BIA Certified for service TC-W" I don't even need to look that up, 20 years later it's still engraved in my memory. Actually, you sometimes can't find this stuff but what you are looking for is "Ash free" oil. You can check the label. The DS7 ran with lots of oil, and that what partly contributed to fouling but also made the engine last a long time under severe use.

More information and plenty of pictures here.

Wednesday, May 31, 2006

Rear Set Installation


Finally, here it is! The rearsets go on! I documented everything while doing it, getting the camera nice and oily in the process. I apologize for the picture quality, as the lighting in the garage is not studio-grade, and I was one-handing most of the shots!